
Linuxviewer API
Window.cxx
#include "sys.h"
#include "Window.h"
#include "TrianglePipelineCharacteristic.h"
This is the file where it all comes together.
As stated above, every compilation unit must begin with including "sys.h".
namespace {

// Define the vertex shader, with the coordinates of the
// corners of the triangle, and their colors, hardcoded in.
constexpr std::string_view triangle_vert_glsl = R"glsl(
#version 450

layout(location = 0) out vec3 fragColor;

vec2 positions[3] = vec2[](
    vec2(0.0, -0.5),
    vec2(-0.5, 0.5),
    vec2(0.5, 0.5)
);

vec3 colors[3] = vec3[](
    vec3(1.0, 0.0, 0.0),
    vec3(0.0, 1.0, 0.0),
    vec3(0.0, 0.0, 1.0)
);

void main()
{
  gl_Position = vec4(positions[gl_VertexIndex], 0.0, 1.0);
  fragColor = colors[gl_VertexIndex];
}
)glsl";
This is the definition of the vertex shader template code
as a C++ raw-string
using d-char-sequence "glsl" (which is arbitrary).
Because this definition begins with "#version"– linuxviewer will not
make changes to it. It is therefore not really a template; it is the
vertex shader code that will be used as-is by the vertex stage.
Using linuxviewer, it is possible to declare objects in the Window class, that represent shader resources (vertex buffers, textures, uniform buffers) that need to be accessible by certain shaders, and give them some (free to choose) ‘string id’. Then one can refer to them in the shader template code using that string id, and linuxviewer will take care of generating the required declaration of GLSL variables, also taking care of enumerations like location, descriptor set and binding numbers, and replace the string ids with those variable names. This will be documentated later.
Our vertex shader doesn’t have many variables: only gl_VertexIndex as input
and gl_Position and fragColor as output.
The vertex shader will be called three times per frame because we’ll record
draw(3, 1, 0, 0) (see vkCmdDraw
) to the command buffer, every frame.
The value of gl_VertexIndex therefore iterate over 0, 1 and 2.
The shader uses that index to read the hardcoded triangle coordinates from
the positions array and convert them to a point with homogeneous coordinates:
a 4D vector with a z-value of 0.0 and a w-value of 1.0, which is written
to gl_Position. Likewise it reads a corresponding color from the array
colors and writes that to fragColor.
Now the position and color of each of the three corners of a triangle
has been defined (remember we set the topology to eTriangleList).
// The fragment shader simply writes the interpolated color to the current pixel.
constexpr std::string_view triangle_frag_glsl = R"glsl(
#version 450

layout(location = 0) in vec3 fragColor;
layout(location = 0) out vec4 outColor;

void main()
{
  outColor = vec4(fragColor, 1.0);
}
)glsl";

} // namespace
Also the fragment shader is specified exactly by starting it with #version.
This shader is called once for every fragment that is (partially) overlapped
by our triangle; hence, most likely, a lot more often than three times;
namely equal to the number of pixels in the output image that need to get a color.
Note that, although there is a one-on-one relationship between a fragment and an output pixel, a fragment contains more information then just a color; it also includes a position, a possible texture coordinate, a depth, and it might not or only partially influence the color of its output pixel because it is blended with – or occluded by – other fragments.
In the case of the HelloTriangle application, each fragment fully determines the output color of its associated pixel.
The input fragColor is the interpolated color value between the three corner colors of the triangle,
calculated based on the fragment’s position within the triangle.
If the triangle had a texture, the fragment coordinates would first be converted
to texture coordinates by interpolating the three u,v coordinates associated with
the triangle’s corners. Then, a ‘sampler’ is used to determine how multiple texture
pixels (texels) contribute to the color of the fragment.
Note that texture pixels are typically called texels to avoid confusion
with pixels of output attachments.
void Window::create_render_graph()
{
  DoutEntering(dc::notice, "Window::create_render_graph() [" << this << "]");
The first of four virtual functions that we must implement.
To make debugging easier, and to make the debug output of other functions–
that might be called from this function– easier to understand, it is a good
idea to begin most functions with a DoutEntering line.
Especially functions that are not called every frame, otherwise it might
flood a bit too much. There is no reason not add one here, since
Window::create_render_graph is called only once.
Typically you’d write to a debug channel (dc) that allows you
to turn off debug output for certain self-consistent parts of the code
once those work. But the general dc::notice is good enough for now.
The idea here is to get an strace-like debug output that literally prints the call stack of functions being called while the program is running (don’t worry, libcwd is fast).
STATEFULTASK  : |   Entering AIStatefulTask::signal(0x4 (logical_device_index_available)) [0x561317eb5d10]
STATEFULTASK  : |     | Running state bs_multiplex / SynchronousWindow_acquire_queues [0x561317eb5d10]
...
VULKAN        : |     | Entering SynchronousWindow::prepare_swapchain()
VULKAN        : |     |   Entering Swapchain::prepare(0x561317eb5d10, , { ColorAttachment }, Fifo)
...
VULKAN        : |     |     Created object "m_swapchain.m_acquire_semaphore [0x561317eb5d10]" with handle 0xe7f79a0000000005 and type vk::Semaphore
NOTICE        : |     | Entering Window::create_render_graph() [0x561317eb5d10]
RENDERPASS    : |     |   main_pass->stores(~swapchain)
RENDERPASS    : |     |   Assigning index #0 to attachment "swapchain" of render pass "main_pass".
RENDERPASS    : |     |   Entering AttachmentNode::set_store() [main_pass/swapchain]
RENDERPASS    : |     |   Entering AttachmentNode::set_clear() [main_pass/swapchain]
RENDERPASS    : |     |   Entering RenderGraph::generate()
...
  // This must be a reference.
  auto& output = swapchain().presentation_attachment();
This is how we get a reference to the output attachment that we can present to.
During rendering this will be a different attachment every frame, as we get
the next unused image
from the swapchain.
The vulkan::rendergraph::Attachment that we get here is just a “placeholder” representing the output attachment
in the render graph.
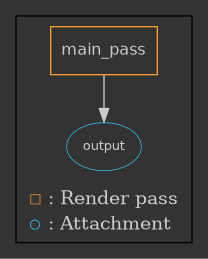
  // Define the render graph.
  m_render_graph = main_pass->stores(~output);
Here the render graph is created. This is the simplest possible render graph, with only a single attachment (output),
and a single RenderPass (main_pass). The ~ in front of output tells the vulkan engine to clear
the output image before rendering into. If we don’t do that then only the triangle is drawn and
the background would be rubbish.
Note that this “abuses” C++ syntax by overloading operators; main_pass is not a pointer, stores isn’t really
function here and output isn’t operated on by the ~. It is just an attempt to “draw” a directed acyclic graph
using C++ syntax. The graph that belong to the above code is:
  // Generate everything.
  m_render_graph.generate(this);
}
After having drawn the graph, we still need to process and use it.
If we omit to call this line then we’ll probably get a Validation Error in vkCmdBeginRenderPass.
void Window::register_shader_templates()
{
  DoutEntering(dc::notice, "Window::register_shader_templates() [" << this << "]");
This virtual function allows us to register the shader templates that were declared at the beginning of this file.
  std::vector<vulkan::shader_builder::ShaderInfo> shader_info = {
    { vk::ShaderStageFlagBits::eVertex,   "triangle.vert.glsl" },
    { vk::ShaderStageFlagBits::eFragment, "triangle.frag.glsl" }
  };
First we construct vulkan::shader_builder::ShaderInfo object for each shader,
initializing it with the stage it will be used in and a string for diagnostics purposes.
  shader_info[0].load(triangle_vert_glsl);
  shader_info[1].load(triangle_frag_glsl);
Then the load member function is used to load the actual shader (template) code.
You can also pass a std::filesystem::path as argument to load the shader code from disk.
auto indices = application().register_shaders(std::move(shader_info));
All shaders must be registered with the application object.
We use the Application as opposed to the Window, because every shader is unique: a hash is calculated and compilation will only occur when the hash is different; otherwise the previously compiled shader will be used. Note that this assumes that if template code is different, then so will be the preprocessed code (with the shader resource variable declarations etc. already generated), which is obviously the case. But also that if the template code is the same that then we can reuse a previously compiled shader, which means that then we assume that also the final shader code is the same. This is not trivial at all– theoretically it is possible that different locations, descriptor set enumerations and/or binding numbers would be used. However, linuxviewer makes sure that that is not case; this is double efficient because that means we not just have less different shaders when not needed, it also means that the same shader resources use the same descriptor set and bindings resulting in a more efficient use of descriptor sets.
  m_shader_vert = indices[0];
  m_shader_frag = indices[1];
}
The function register_shaders returns an array with ShaderIndexs, here stored as indices;
we also could have stored our m_shader_vert and m_shader_frag in an array and used 0 and 1 to index that array.
Remember that we used these two variables in
the pipeline characteristic
to link them to the pipeline that we’ll be creating.
void Window::create_graphics_pipelines()
{
  DoutEntering(dc::notice, "Window::create_graphics_pipelines() [" << this << "]");
This virtual function allows us to initialize the pipeline factory that must create our pipeline.
m_pipeline_factory = create_pipeline_factory(m_graphics_pipeline, main_pass.vh_render_pass() COMMA_CWDEBUG_ONLY(true));
The member m_pipeline_factory that we added to our Window class is just a handle that can store
information that identifies a factory. We still have to create it, which is what happens here.
Another member, m_graphics_pipeline, is passed as the first parameter.
This is an output parameter: eventually the information needed to access the created pipeline will be written to m_graphics_pipeline.
The second parameter is the Vulkan Handle to our render pass, which was created in the meantime.
m_pipeline_factory.add_characteristic<TrianglePipelineCharacteristic>(this COMMA_CWDEBUG_ONLY(true));
Here the pipeline characteristic is added to the pipeline factory. If there were more than one characteristics we’d just do more calls like this. Note a different characteristic corresponds to a different type, not to an object.
   m_pipeline_factory.generate(this);
}
As was the case in Window::create_render_graph, we have to finish with a call to generate,
in this case signaling the factory task that is was fully initialized.
void Window::render_frame()
{
  // Start frame.
  start_frame();
This virtual function is called every frame, therefore it has no DoutEntering line at the beginning as that would
flood the debug output too much. Optionally one could use the special debug channel dc:vkframe, normally
turned off, because that is already used for
debug output printed every frame.
The function start_frame() is required. It causes us to advance to the next FrameResourcesData, rotating
over the number of available frame resources.
Frame resources, in this context, are Vulkan objects that are “in use” while drawing to or presenting a frame. In order to avoid stalling it is necessary to use more than one of them, so you can work with one instance while another is still being used for the previous frame, just like is the case with swapchain images.
Linuxviewer creates multiple “frame resource” instances for the following Vulkan objects:
- Attachments: these render targets and depth-stencil buffers, that are part of the framebuffer object, remain “in use” while rendering. The output attachment too and even during presenting, but that attachment is part of the swapchain.
- Command buffers and pools: the command buffer stores a series of GPU commands, such as drawing or memory operations. Also these stay “in use” even after committing the command buffer to a queue.
- Fences: these are used to ensure proper synchronization between the CPU and GPU, preventing the GPU from executing commands on resources that are still in use. For example, a Fence is used to signal when a command buffer has completed its execution.
- Certain descriptor sets: descriptor sets that contain a descriptor to a shader resource that is changed every frame; for example, certain uniform buffers. Those descriptor sets automatically are allocated multiple times and iterated over every new frame in order to avoid stalling.
Linuxviewer hides all of this from the user.
The number of frame resources that are created can be changed by overriding the virtual function number_of_frame_resources in your Window class.
  // Acquire swapchain image.
  acquire_image();                    // Can throw vulkan::OutOfDateKHR_Exception.
This acquires the next (unused) vkImage from the swapchain and does the required internal adjustments.
It is possible that acquiring a swapchain image fails with vk::Result::eErrorOutOfDateKHR
because the window was resized and the swapchain images are no longer suited for presentation.
If that happens then this function will throw an exception that is caught elsewhere and
causes the whole swapchain to be regenerated. In other words: linuxviewer also takes care
of window resizing for you.
  // Draw scene/prepare scene's command buffers, includes command buffer submission.
  draw_frame();
Call our own private function that records and commits the command buffer. See below.
  // Draw GUI and present swapchain image.
  finish_frame();
}
Does the actual presentation of the rendered image. Also this might fail due to a window resize in which case an exception is thrown, leading to the regeneration of the swapchain.
void Window::draw_frame()
{
This function records the command buffer(s). It assembles all the building blocks that we have prepared, most notably the correct pipeline(s) and the dynamic state of those pipelines.
It begins with grabbing a pointer to the current FrameResourcesData object:
vulkan::FrameResourcesData* frame_resources = m_current_frame.m_frame_resources;
The next line links the appropriate VkImages to our
imageless framebuffer:
main_pass.update_image_views(swapchain(), frame_resources);
  auto swapchain_extent = swapchain().extent();

  vk::Viewport viewport{
    .x = 0,
    .y = 0,
    .width = static_cast<float>(swapchain_extent.width),
    .height = static_cast<float>(swapchain_extent.height),
    .minDepth = 0.0f,
    .maxDepth = 1.0f
  };

  vk::Rect2D scissor{
    .offset = vk::Offset2D(),
    .extent = swapchain_extent
  };
Here we prepare a vk::Viewport and a vk::Rect2D for the dynamic state registered
through m_dynamic_states, see
TrianglePipelineCharacteristic.
Note that by making these two dynamic you avoid having to recreate the pipeline everytime the window is resized (although we still recreate all attachment- and swapchain images).
  wait_command_buffer_completed();
  m_logical_device->reset_fences({ *frame_resources->m_command_buffers_completed });
Even though we rotate over multiple command buffers, and other resources that are
used inside them, it can still happen that the command buffer we have to use next
is still in use (most notably when you override number_of_frame_resources
and have that return 1). Therefore here we wait until the frame resources that
we’re about to (re)use are no longer in use by a previous frame.
Then the fence that is used for this synchronization is reset, so that we can reuse it to signal us when the command buffer that we’re about to record has completed.
If drawing is fast enough we virtually use no CPU in between frames and the draw_frame function could be called very rapidly, creating (command buffers for) several new frames, until we run out of frame resources, or out of swapchain images.
In the latter case, blocking occurs during presenting: inside finish_frame that is called at the bottom of Window::render_frame as soon as we return from the current function—because we’re using vk::PresentModeKHR::eFifo which waits for VSYNC.
The former would block here, in wait_command_buffer_completed.
Neither is very good for latency. In the ideal case you’d want to wait for user input (i.e. mouse or keyboard) for as long as possible before starting to render things that depend on them (which is basically everything when you’re -say- rotating the camera) then start to render the frame and finish just in time to present it before the next VSYNC.
In other words, you don’t want to call draw_frame as fast as possible, but—depending on how long it takes to render the next frame—wait as long as possible, so you have time to incorporate the latest user input into the next frame.
The best guess here is to assume that the next frame will take just as long as the previous frame; and if that is the case, then the calls to draw_frame will be happen at the same, constant interval as VSYNC; lets say 60 times per second.
Linuxviewer allows to control the delay at which draw_frame is called by specifying a minimum interval timeval that must have passed between those calls. If your monitor is 60 FPS and the each frame takes about as much to render as the previous one, then setting this delay to a little less than 1/60 of a second makes sense. The default can be controlled by overriding the virtual function frame_rate_interval.
The default interval is currently set to 10 ms, suitable for 60 FPS monitors. If you have a 120 FPS monitor you might want to override frame_rate_interval and for example return threadpool::Interval<5, std::chrono::milliseconds>{};.
vulkan::handle::CommandBuffer command_buffer = frame_resources->m_command_buffer;
Get the current command buffer to use from the frame_resources object.
  Dout(dc::vkframe, "Start recording command buffer.");
  command_buffer.begin({ .flags = vk::CommandBufferUsageFlagBits::eOneTimeSubmit });
  {
Begin recording to the command buffer.
The flag specifies that the command buffer will be submitted to a queue for execution exactly once and should not be reused after that. Using this flag can provide performance benefits by giving the Vulkan implementation hints on how to optimize memory allocation and resource management for the command buffer.
command_buffer.beginRenderPass(main_pass.begin_info(), vk::SubpassContents::eInline);
Begin the render pass. We only have one render pass in this example.
vk::SubpassContents::eInline is an enumerator in the Vulkan API that is used to specify the contents of a subpass when you begin recording it within a command buffer. Subpasses are part of Vulkan’s render pass structure and allow you to perform various operations on attachments (such as color and depth buffers) within a single render pass.
There are two types of subpass contents:
-
vk::SubpassContents::eInline: This specifies that the commands used for rendering are to be embedded directly in the primary command buffer, along with any other commands. With this mode, the commands recorded in the primary command buffer are executed sequentially, and no secondary command buffers are used. -
vk::SubpassContents::eSecondaryCommandBuffers: This specifies that the rendering commands for this subpass are not directly included in the primary command buffer. Instead, the primary command buffer will reference secondary command buffers that contain the actual rendering commands. This allows you to execute multiple secondary command buffers concurrently, which can help with load balancing and parallelism.
When you begin a subpass using vk::CommandBuffer::beginRenderPass in C++ or beginRenderPass as above using linuxviewer, you need to provide a vk::SubpassContents value to indicate the contents of the subpass. Choosing vk::SubpassContents::eInline means that the rendering commands will be directly recorded into the primary command buffer, and you will not use secondary command buffers for this subpass. This can be useful for simple rendering operations where parallelism and command reusability are not critical factors.
    command_buffer.setViewport(0, { viewport });
    command_buffer.setScissor(0, { scissor });
Record the dynamic state regarding the viewport and scissors into the command buffer.
    if (m_graphics_pipeline.handle())
    {
      command_buffer.bindPipeline(vk::PipelineBindPoint::eGraphics, vh_graphics_pipeline(m_graphics_pipeline.handle()));
      command_buffer.draw(3, 1, 0, 0);
    }
    else
      Dout(dc::warning, "Pipeline not available");
As stated before, at the moment we need to check if the pipeline was already created by
testing the value of m_graphics_pipeline.handle(). This will be fixed later at which
point this documentation will also be updated.
Once the pipeline has become available we first bind the it to the command buffer,
and then record a draw call that will cause 3 vertices and 1 instance to be drawn,
starting with gl_VertexIndex = 0 and gl_InstanceIndex = 0.
    command_buffer.endRenderPass();
  }
  command_buffer.end();
  Dout(dc::vkframe, "End recording command buffer.");

  submit(command_buffer);
}
Here we first mark the end of the render pass, then complete the
recording of the command buffer by calling command_buffer.end().
Finally, the command buffer is submitted to a queue for execution.